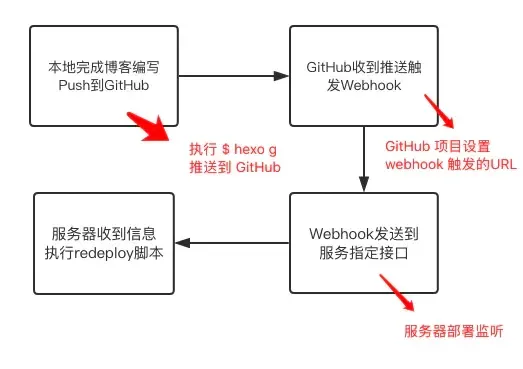
webhook是一种可以让人远程调用的RPC指令集,可以实现更新github仓库后自动更新部署你的Hexo博客,当然几乎所有的你能想到的东西都能做,本文将详细讲解webhook自动化部署静态博客方法
上面这个仓库支持在你的VPS 快速建立一个webhook 接口。然后利用 github webhook 通知你的 VPS 来拉取最新的代码部署
对于 webhook 来说,可以自己写一个脚本来接受信息,思路很简单,运行一个 HTTP Server,监听服务器的某个端口,如果有消息传递过来,那么就运行事先写好的脚本,来完成 webhook 的功能即可。
安装 webhook
这里推荐三种安装方法,使用其中一种方法即可,github 下载速度可能很慢,推荐使用系统源安装的方式
法一:使用系统源的安装方式
如果是 Ubuntu 系统,可以直接使用下面的命令进行安装:
$ sudo apt-get update
$ sudo apt-get install webhook
法二:使用 github 下载
webhook 的 release 链接,找到对应的选项 webhook-linux-amd64.tar.gz 右键复制链接 ,当前最新版本链接为
# 下载对应的软件
$ wget https://github.com/adnanh/webhook/releases/download/2.8.1/webhook-linux-amd64.tar.gz
# 解压进入
$ tar -zxf tar -zxf webhook-linux-amd64.tar.gz && cd webhook-linux-amd64/
$ ./webhook
法三:Golang 环境下安装
首先安装 Golang 环境(这里略过),然后安装 webhook,这里注意需要已经设置了 GOPATH
# 安装对应的工具
$ go get github.com/adnanh/webhook
# 安装完成之后可以在 $GOPATH/bin 下找到对应的执行文件
$ echo $GOPATH
/root/go
$ ls /root/go/bin
webhook
# 将路径写入到 shell 可以直接执行
$ vi ~/.bash_profile
# 在文件最后一行加入对应内容
export PATH="/root/go/bin:$PATH"
# 更新文件使其生效
$ source ~/.bash_profile
# 测试命令是否已经成功安装,得到输出说明安装完成
$ webhook
配置 webhook
我们的 hooks.json 文件现在看起来是这样的:
[
  {
    "id": "redeploy-webhook",
    "execute-command": "/var/scripts/redeploy.sh",
    "command-working-directory": "/var/webhook"
  }
]
注意:如果您更喜欢 YAML 格式,等价的 hooks.yaml 文件如下:
- id: redeploy-webhook
  execute-command: "/var/scripts/redeploy.sh"
  command-working-directory: "/var/webhook"
您现在可以使用以下命令运行 webhook:
$ /path/to/webhook -hooks hooks.json -verbose它将在默认端口 9000 上启动,并为您提供一个 HTTP 终端:
http://yourserver:9000/hooks/redeploy-webhook更多配置参数
webhook/docs/Webhook-Parameters.md at master
Usage of webhook:
  -cert string
        path to the HTTPS certificate pem file (default "cert.pem")
  -cipher-suites string
        comma-separated list of supported TLS cipher suites
  -debug
        show debug output
  -header value
        response header to return, specified in format name=value, use multiple times to set multiple headers
  -hooks value
        path to the json file containing defined hooks the webhook should serve, use multiple times to load from different files
  -hotreload
        watch hooks file for changes and reload them automatically
  -http-methods string
        globally restrict allowed HTTP methods; separate methods with comma
  -ip string
        ip the webhook should serve hooks on (default "0.0.0.0")
  -key string
        path to the HTTPS certificate private key pem file (default "key.pem")
  -list-cipher-suites
        list available TLS cipher suites
  -logfile string
        send log output to a file; implicitly enables verbose logging
  -nopanic
        do not panic if hooks cannot be loaded when webhook is not running in verbose mode
  -pidfile string
        create PID file at the given path
  -port int
        port the webhook should serve hooks on (default 9000)
  -secure
        use HTTPS instead of HTTP
  -setgid int
        set group ID after opening listening port; must be used with setuid
  -setuid int
        set user ID after opening listening port; must be used with setgid
  -template
        parse hooks file as a Go template
  -tls-min-version string
        minimum TLS version (1.0, 1.1, 1.2, 1.3) (default "1.2")
  -urlprefix string
        url prefix to use for served hooks (protocol://yourserver:port/PREFIX/:hook-id) (default "hooks")
  -verbose
        show verbose output
  -version
        display webhook version and quit
  -x-request-id
        use X-Request-Id header, if present, as request ID
  -x-request-id-limit int
        truncate X-Request-Id header to limit; default no limit
实战
创建各种配置文件
# pwd
/www/docker/webhook

# tree .
.
├── bin
│   └── webhook
├── xxx
└── webhook-linux-amd64.tar.gz

2 directories, 2 files
利用 uuidgen 生成随机 ID
# uuidgen
ecbfc10e-6b2d-4d32-98da-bdd2c3c29fc7
hooks.yaml
- id: redeploy-hblog-xxxxx-7e86-4f24-8667-23xxxxxxx1
  execute-command: "/www/docker/webhook/github-webhooks/depHblog.sh"
  command-working-directory: "/www/wwwroot/blog.17lai.site"
depHblog.sh
#!/bin/sh

# 创建临时目录
temp_dir='/www/docker/webhook/tmp/hexoblog'
dst_dir='/www/wwwroot/blog.17lai.site'
repo_url='https://github.com/appotry/hexo.git'
data_dir=''

# 在这里进行你的操作,例如复制文件、下载内容等


# 检查目标目录是否存在 .git 目录
if [ -d "$temp_dir/.git" ]; then
    # 如果存在 .git 目录,则执行 git pull 命令进行更新
    echo "Repository already cloned. Performing git pull..."
    cd "$temp_dir"
    git pull origin main  # 如果使用了默认的主分支名字为 main
    git reset --hard origin/main
else
    # 如果不存在 .git 目录,则执行 git clone 命令进行克隆
    rm $temp_dir -rf
    echo "Cloning repository into $temp_dir..."
    git clone --progress -v --depth 1 "$repo_url" "$temp_dir"
fi


echo "rsync 目录同步"

# -a:表示以归档模式同步,保留文件的所有属性,包括权限、时间戳等。
# -v:表示详细模式,显示同步过程中的详细信息。
# --delete:表示删除目标目录中源目录没有的文件。
rsync --delete -r --exclude='.git' --link-dest="$dst_dir" ${temp_dir}/${data_dir} ${dst_dir}

echo "设置文件权限"
chown www:www ${dst_dir}/${data_dir}  -R
vim depHblog.sh
chmod +x depHblog.sh
curl -X POST https://xxxx.17lai.site/hooks/redeploy-hblog-xxxx8fa-7e86-4f24-8667-23axxxx
# 运行测试
su root
/www/docker/webhook/bin/webhook -hooks /www/docker/webhook/github-webhooks/hooks.json -verbose -port <通信端口>
/www/docker/webhook/bin/webhook -hooks /www/docker/webhook/github-webhooks/hooks.yaml -verbose -port 18xxx后台运行
nohup webhook -hooks /usr/local/bin/github-webhooks/hooks.json -verbose -port <通信端口> &反向代理
可以直接端口运行,当然上SSL 安全性更高!
这里使用 反向代理 复用443
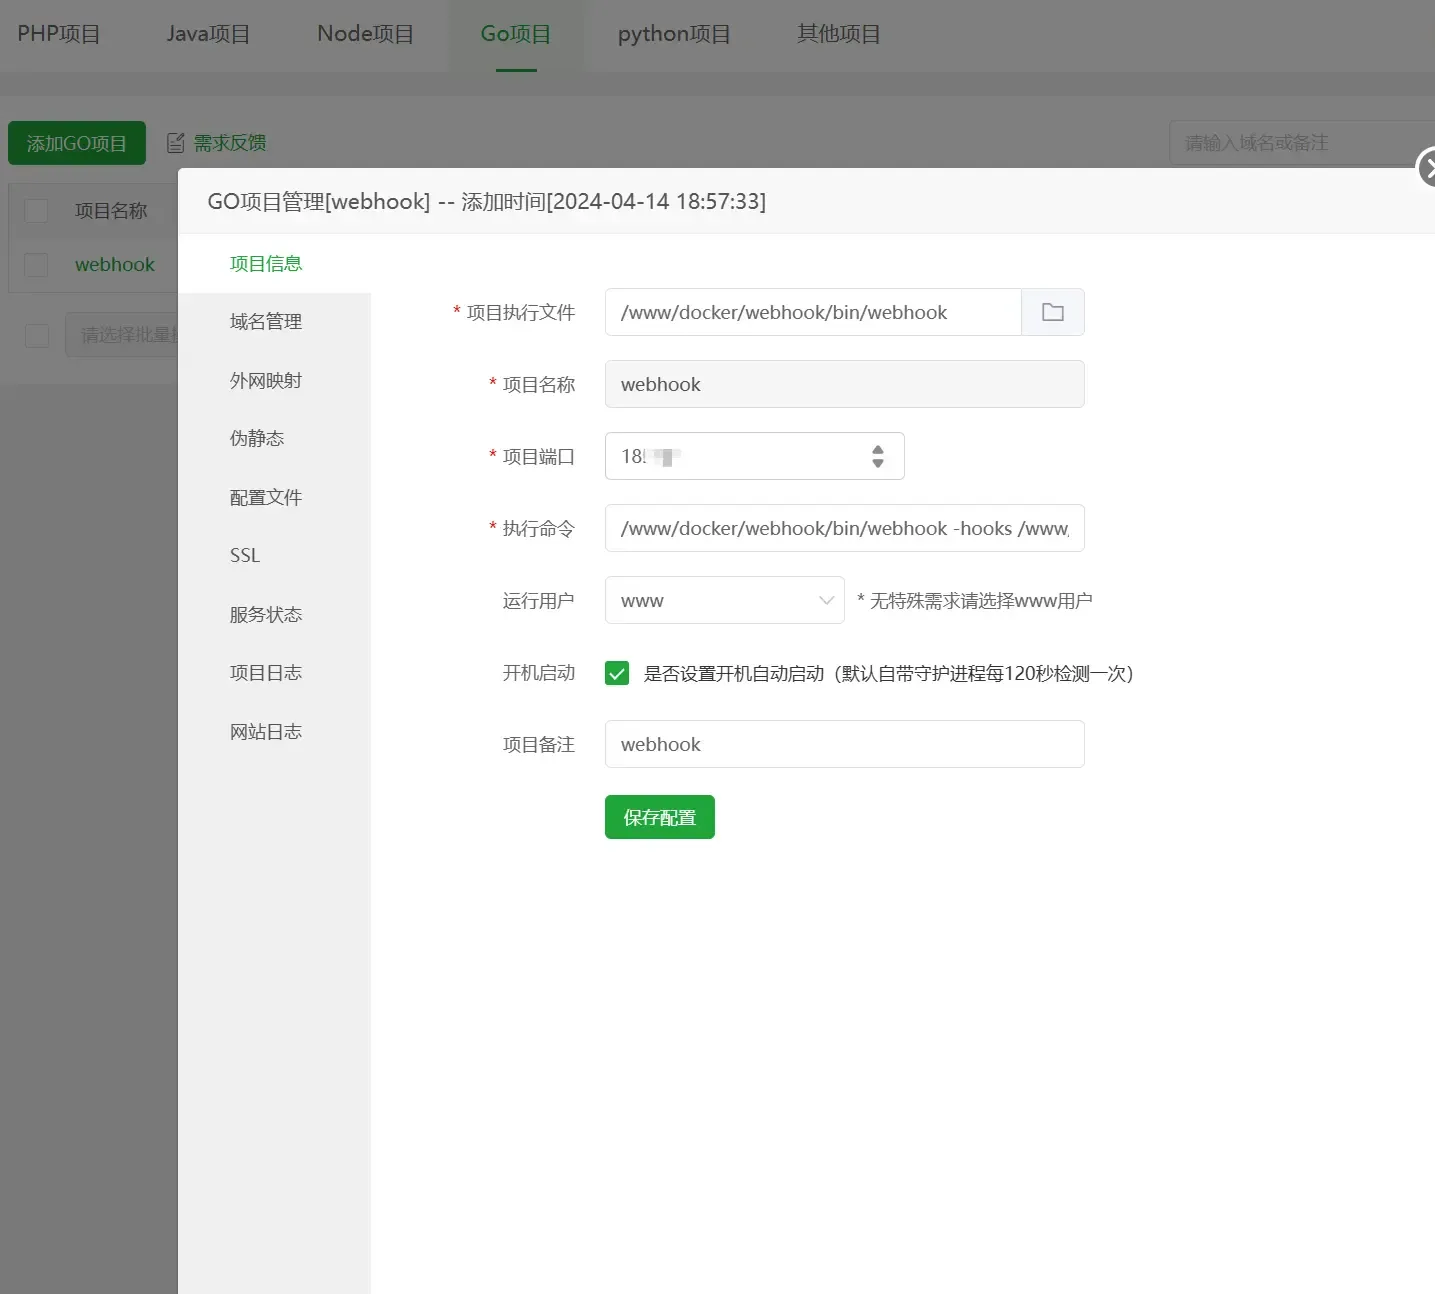
宝塔面板 go 项目
调用测试
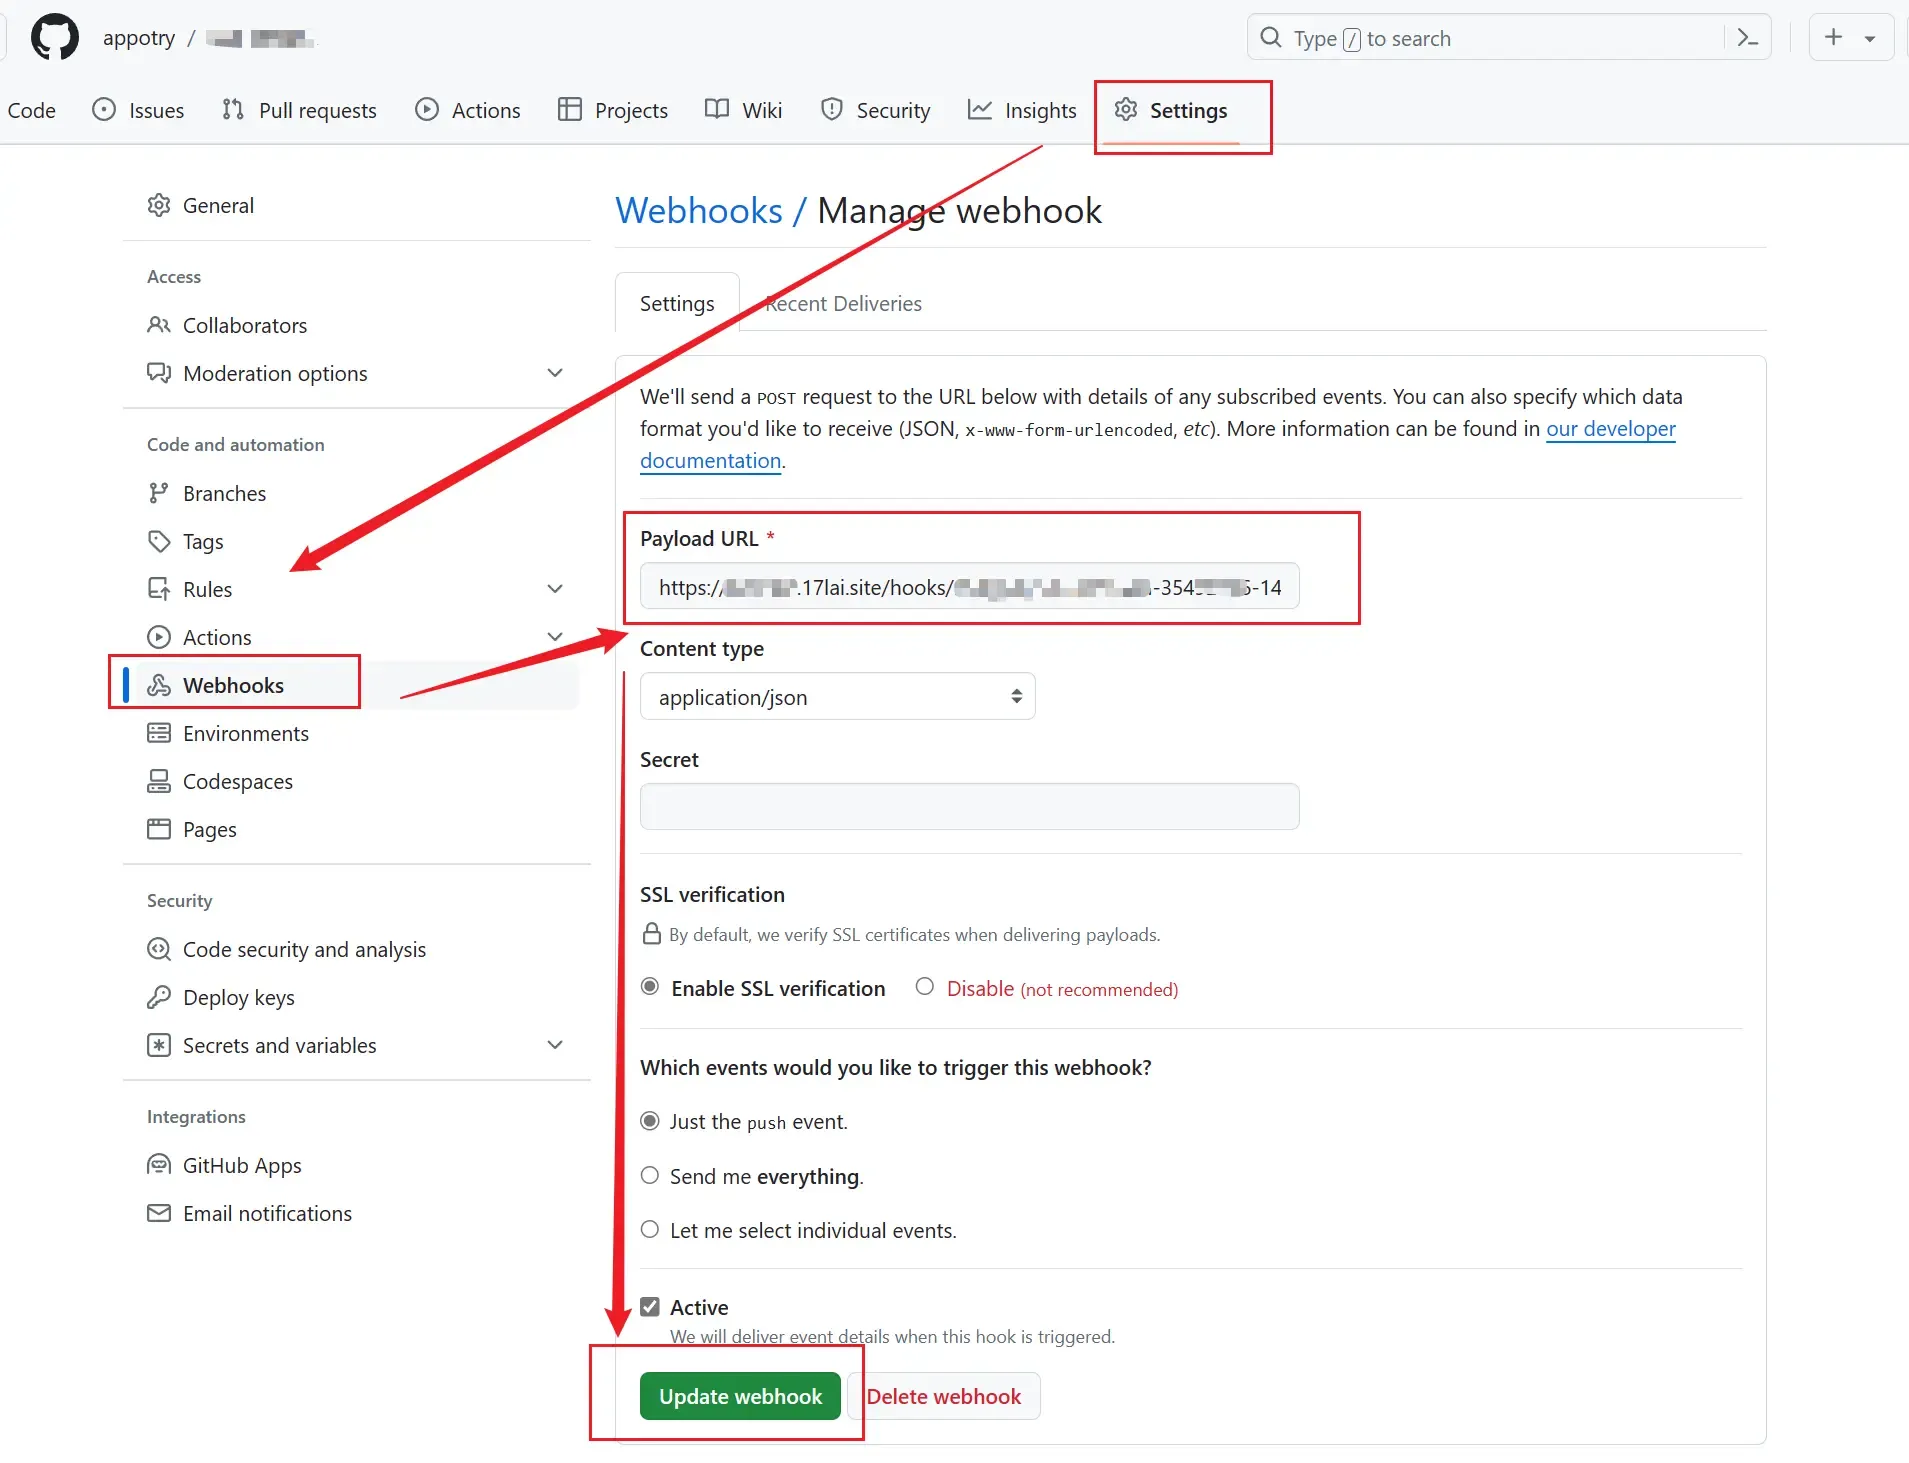
curl -X POST https://xxx.17lai.site/hooks/redeploy-hblog-xxxa-7e86-4f24-8667-2xxxx3xx关联github仓库
上面命令测试成功之后就可以正式和 github 仓库关联起来了
后话
webhook 实际应用非常强大,只要你有想象力,几乎无所不能!
本文也在 hexo博客增强部署篇 一文中有提到。hexo 博客 系列文章越写越长,有兴趣可以再去看看,更新了很多东西了
参考&致谢
系列教程
Hexo系列
[十万字图文教程]基于Hexo的matery主题搭建博客并深度优化完全一站式教程
- Hexo Docker环境与Hexo基础配置篇
- hexo博客自定义修改篇
- hexo博客网络优化篇
- hexo博客增强部署篇
- hexo博客个性定制篇
- hexo博客常见问题篇
- hexo博客博文撰写篇之完美笔记大攻略终极完全版
- Hexo Markdown以及各种插件功能测试
- markdown 各种其它语法插件,latex公式支持,mermaid图表,plant uml图表,URL卡片,bilibili卡片,github卡片,豆瓣卡片,插入音乐和视频,插入脑图,插入PDF,嵌入iframe
- 在 Hexo 博客中插入 ECharts 动态图表
- 使用nodeppt给hexo博客嵌入PPT演示
- GithubProfile美化与自动获取RSS文章教程
- Vercel部署高级用法教程
- webhook部署Hexo静态博客指南
- 在宝塔VPS上面采用docker部署waline全流程图解教程
- 自建Umami访问统计服务并统计静态博客UV/PV
笔记系列
- 完美笔记进化论
- hexo博客博文撰写篇之完美笔记大攻略终极完全版
- Joplin入门指南&实践方案
- 替代Evernote免费开源笔记Joplin-网盘同步笔记历史版本Markdown可视化
- Joplin 插件以及其Markdown语法。All in One!
- Joplin 插件使用推荐
- 为知笔记私有化Docker部署
Gitbook使用系列
- GitBook+GitLab撰写发布技术文档-Part1:GitBook篇
- GitBook+GitLab撰写发布技术文档-Part2:GitLab篇
- 自己动手制作电子书的最佳方式(支持PDF、ePub、mobi等格式)